Before now, I had no idea that was a thing. But it looks like it is a common enough problem faced by Apple iPhone users around the world. while trying to install iOS updates. If your iPhone is stuck in an Attempting Data Recovery loop, below are the steps I took to solve the problem.
Why does your iPhone keep saying Attempting Data Recovery?
The Attempting Data Recovery loop issue occurs for a number of reasons, but at the root of them all is an update bug that occurs fairly often when updating your device to a new iOS version via iTunes.
Fix the “Attempting Data Recovery” Loop Issue by Performing a Force Restart
One of the things I learned from following Mister Mobility over the years is that a simple restart or a force restart is a solution to many problems that my smartphone throws up. It turns out that a force restart is one of the ways to fix this Attempting Data Recovery loop problem. Depending on which iPhone model you have, the way to go about a force restart differs. Here are the different methods for different iPhone models.
How to force restart iPhone 8 all the way to iPhone 11 Pro Max:
Press and quickly release the Volume Up button Press and quickly release the Volume Down button Press and hold the Power button until you see the Apple logo. Enter your passcode at the startup sequence.
How to force restart iPhone 7/7 Plus:
Press and hold the Power button Without releasing the Power button, press and hold the Volume Down button until the Apple logo appears on the screen Enter your passcode at startup.
How to force restart iPhone 6s/SE or earlier:
Press and hold down the Home button Without releasing the Home button, press and hold the Power button until the Apple logo appears on the screen Release both buttons and wait for the start sequence Enter your passcode at start sequence.
Once the force restart is complete, your iPhone or iPad should work well once again and not display the Attempting Data Recovery loop on the screen any more. If the problem is solved now, you can stop here now. The next section of this article is not for you. The next section is for you only if you do not remember your passcode will following the above steps to fix the Attempting Data Recovery loop problem.
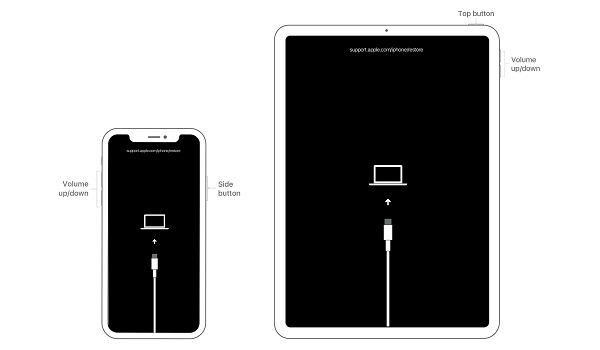
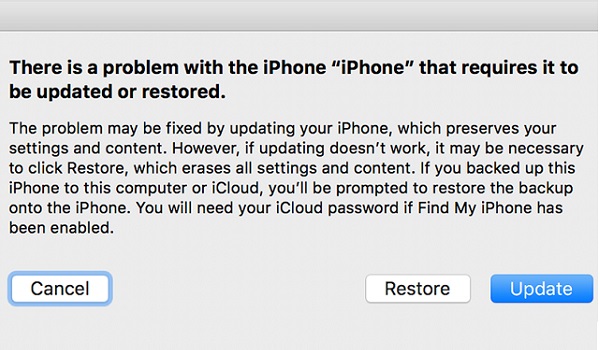
What if you forgot your passcode while fixing the Attempting Data Recovery loop?
This is a fairly common problem too during a recovery attempt. Some times, you forget your passcode, and since it is needed to complete the Attempting Data Recovery fix steps above, you are stuck at that point. What can you do? Yes; you can fix this situation, but you will lose all the data on your iPhone or iPad. Not remembering your passcode means you will be denied access to all data on the phone. It is unpleasant news, but it is a security measure to ensure that your data does not fall into the hands of strangers. Hopefully, you had your device backed up before the Attemping Data Recovery loop problem showed up. That way, you can restore them after recovering your device. If you don’t have any backups, I am afraid that’s it: your data is as good as gone. To recover your iPhone or iPad without a passcode, you will need a computer. If you do not have one and cannot find one to use, you have to send your iDevice to an authorised service centre for recovery. Note that if the above process takes more than 15 minutes, your device will exit recovery mode and you’ll need to repeat this process. That is it, friends. A force restart solved the Attempting Data Recovery loop problem for me. Thankfully, I did not forget my password and so did not have to wipe the data on my iPhone or worry about whether I had backups or not. Let me know how it goes with you. It will be nice to know that this article helped someone else out. PS: I am told that there are 3rd party software available that you can use to recover your lost data should this happen to you.